In this upcoming release, Expedient will be giving users the ability to modify the Recipients and the Email Subject and Bodies which are automatically populated into our print menus when users attempt to send documents. This will be made possible with the new set up screens which are listed below along with a short summary of what the purpose of each screen is.
- Document Masterfile (Administration -> Document Management -> Document Masterfile)
- This screen is replacing the old Document ID Masterfile screen and will continue to store all document type codes as records, along with their default configurations as well as what levels the document code applies to. Additionally, the screen now also lets users view the recipient configurations attached to the document code. Please read below for more information about the recipients configurations.
- Recipients Configuration (Administration -> Document Management -> Recipients Configuration)
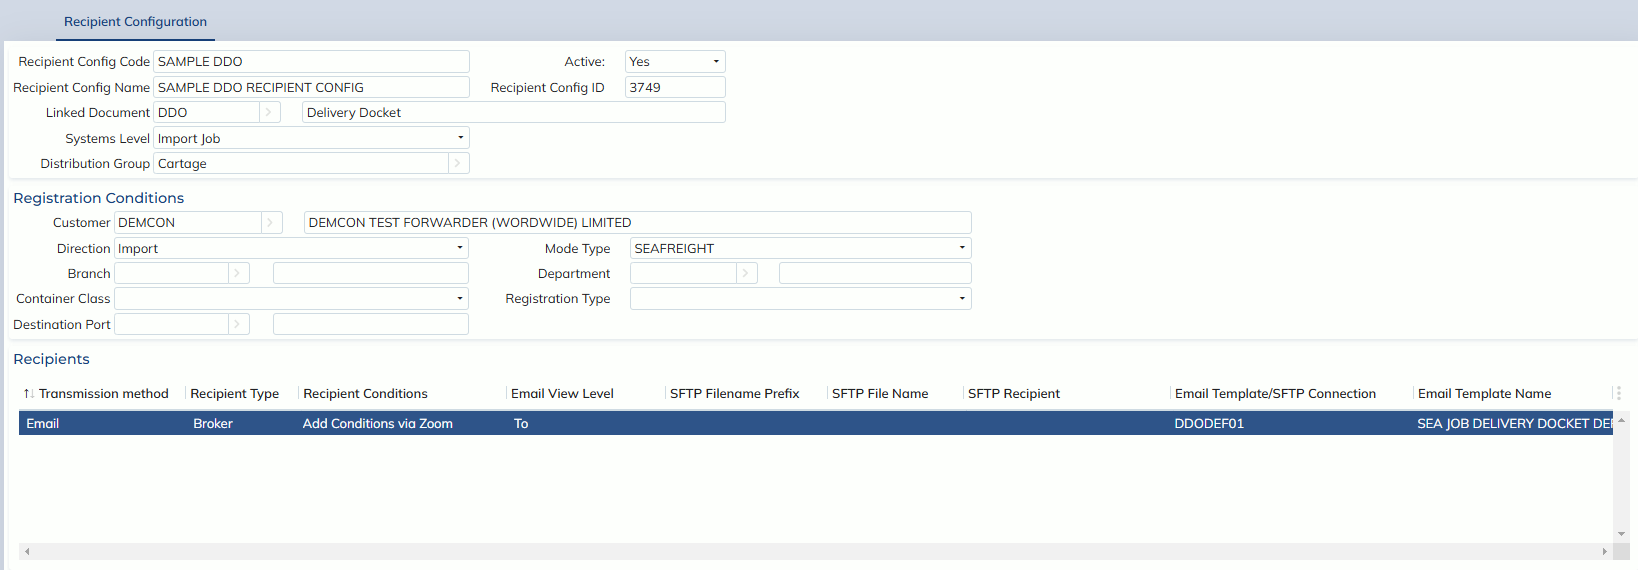
- This is a newly introduced screen which will allow users to create Recipients Configurations. These configurations will determine the default recipient of any document prints. This is done by Expedient by searching all recipients configurations that have the Linked Document and the Systems level you are printing. Expedient will then search the Registration Conditions to determine which recipients configuration suits the record which you are printing the best. The system will then use this recipients configuration and look at the Recipients section underneath to determine the Recipient Type as well as the Email Template that Expedient should populate into the print for you. Each recipient line can also have its own recipient conditions so that users can specify even further the scenario that they want the recipient populating into a print for.
- For an example, if you are printing a Delivery Docket from an import job level, the record in the screenshot below can be matched as the Linked Document is DDO and the Systems level is Import Job. The system will then check the Registration Conditions to see if the customer on the job is DEMCON, the direction is Import and that the Mode Type is Sea freight on the job. If these are indeed true on the job and there is no other recipient configuration with a better match to the job, the system will then select this record as the “most specific” Recipient Configuration. Please note that the Distribution Group in this most specific print is Cartage. This means that whenever a Delivery Docket is printed using this configuration, the Delivery Docket is considered a part of the Cartage distribution group and will only populate personnel who are set up to receive the Cartage Distribution group or the DDO document. The system will then also look at the Recipients section and populate the Broker’s personnel set up to receive the Delivery Docket or Cartage distribution group. The email subject and email body will then be populated according to the email template DDODEF01. Please read below for more information about the email templates.
-
- Email Templates (Administration -> Corporate -> Email Templates -> Email Template Masterfile)
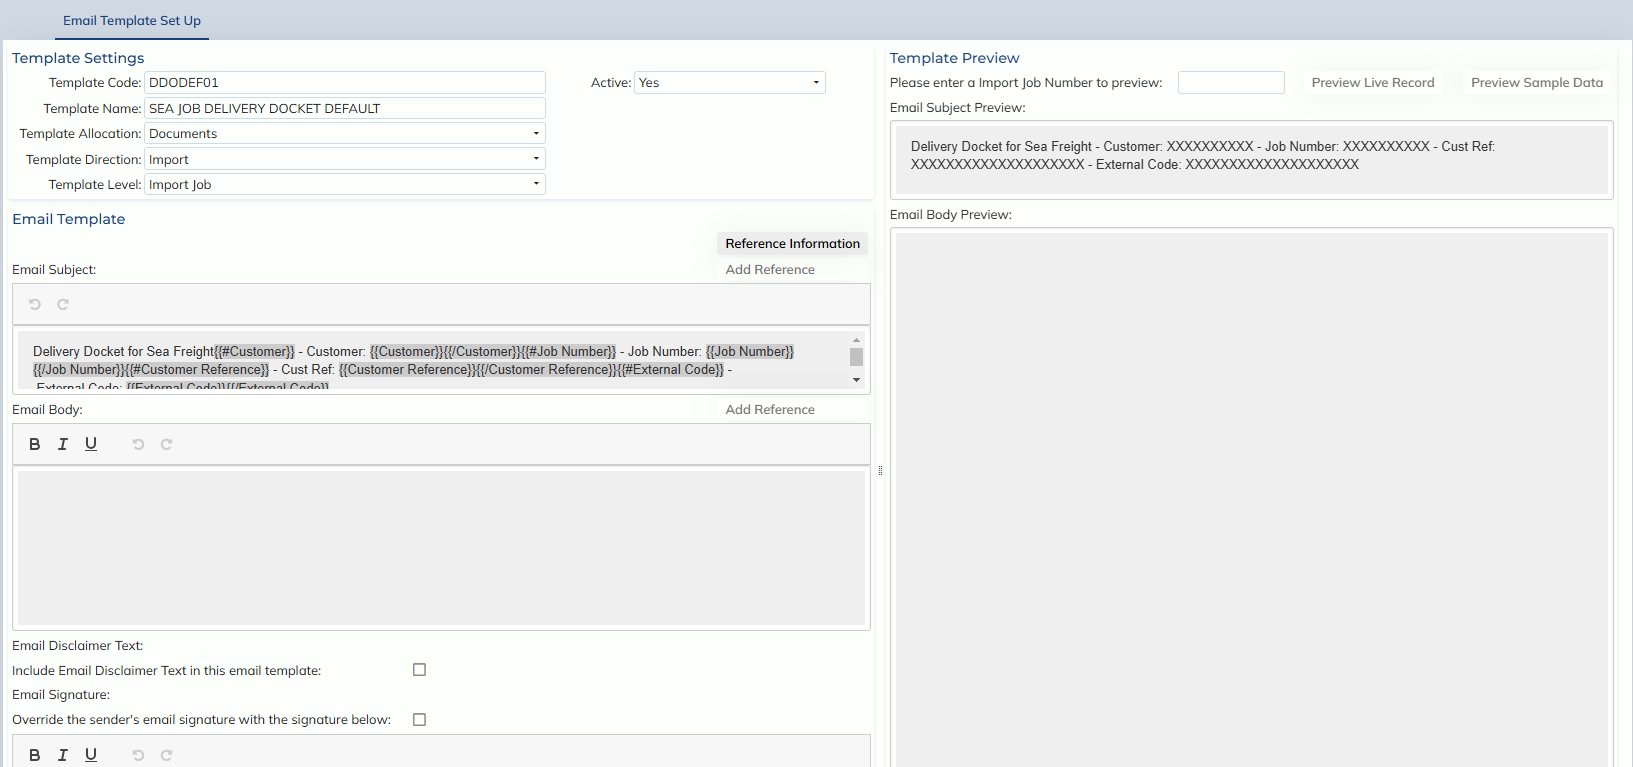
- This is also a newly created screen which will allow users to create Email Templates. Users will be able to select a Template Allocation, Direction and Level that the email template applies to. Templates can then be linked in the Recipients Configuration screen to recipient configurations at the same level. Users can type an email subject as well as an email body and store it into the email template record so that it can be used in future prints whenever this email template record is chosen. Please also note that users can choose to attach email disclaimer text by ticking the Email Disclaimer Text tickbox. A manually typed email signature can also be used by typing into the email signature textbox and ticking the tickbox. This email signature will then override the user’s email signature in the print.
- Users may also use References to pull in data into the email subject or body directly from the record that they’re printing a notification for. As an example, if you want to include the job number or the house bill into your subject, you can use the house bill number reference which will then convert to the job’s actual house bill when being printed. For information on how to use these references, please click on the “Reference Information” button just above the email subject textbox in the Email Template screen.
- For an example, in the below screenshot you can see a sample Email Template. In this template, we can note that the Allocation, Direction and Level are Documents and Import Job. This means that this email template can be used for any document print on the Import Job level. The subject has manual text entered as well as a few references. Please note the references are the highlighted {{#Customer}} texts for an example. If you look to the Preview section, you can see how the email subject should appear in an actual email after the references have been converted into their real values. In our sample preview, we have “sample data” which shows X’s rather than real data, but in the real emails you will see the real data as it is registered in the job.
-